
In this article, I will teach you something fun. I am going to teach how to send an email!
Don’t get me wrong though. I am not going to teach you how to login to your gmail and send an email to your best friend.
You probably can do that on your own.
Instead I am going to teach you how to do that using python in FIVE lines of code.
And why would I need to do that you ask?
Imagine you run a business that maintains a database of a large number of customers.
Let’s assume this database stores the names of your customers as well as products they might be interested in based on their previous purchases.
Now you want to send a personalized email to each one of your customers addressing them with their names, and pitching new products that they might be interested in.
Would you manually write an email for each one of them? There are thousands of them!
Of course not!
This is when programming comes into play because you can programmatically send an email with a dynamic body to each one of them. So instead of manually writing thousands of emails, you just write a few lines of code and you’re good to go.
Let’s get started.
SMTP Primer
Instead of rushing it and showing you the code, it’s much better if you learn a little bit about the theory of how email works under the hood first.
The protocol that enables the email technology is called the SMTP Protocol or simple mail transfer protocol.
It’s in fact pretty simple. It is just a set of rules that govern how two mail servers can talk to each other.
I wrote an in-depth article about SMTP and I totally recommend reading it first before continuing.
With that said, you don’t have to know how SMTP works to be able to send an email using python but it is highly valuable.
Python provides you with an smtplib module that abstracts away all the complexities of SMTP. This module essentially implements the SMTP protocol for you. So all you need to do is instruct this module to send an email, sit down, relax, and watch smtplib do all the heavy lifting for you.
The code
Before I start talking about this incredibly easy way to send an email with python, I want to start by showing you the code just to give you a sense of how simple, short, and easy the code actually is.
import smtplib

server = smtplib.SMTP_SSL('smtp.gmail.com', 465)
server.login("your username", "your password")
server.sendmail(
  "from@address.com",
  "to@address.com",
  "this message is from python")
server.quit()
This code assumes python3 and that you have an email account on gmail, but the same concepts would work for any email service.
the code represents a client application that talks to your email server (running on smtp.gmail.com) and it requests that the server sends an email with the message “this message is from python” to email address “to@address.com”
Before you run the code
If you take the code I just wrote above and try to run it immediately after you replace the login information with your specific information, you’ll get an error like this one.
smtplib.SMTPAuthenticationError: Please log in via your web browser and then try again. Learn more at https://support.google.com/mail/answer/78754
So what does this error mean?
Don’t worry. There is actually nothing wrong with the code.
Gmail by default tries to make your email secure by preventing this type of third-party access. You can manage your gmail security settings by going to this link and allowing less secure apps. It’s turned off by default so you have to turn it on.
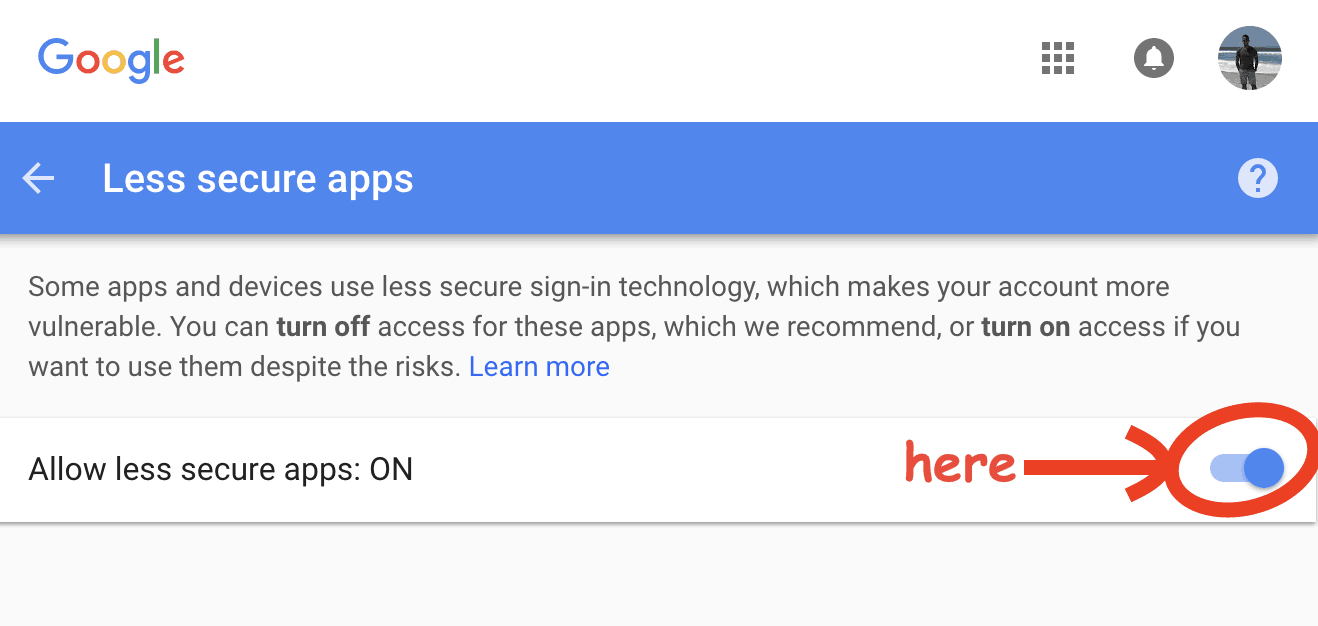
Now hear me out. I totally recommend against allowing less secure apps to connect to your gmail because this would open the doors to some security attacks.
So here is what I want you to do: You should allow less secure apps only to test the code and experiment with it but once you’re done, remember to return your security settings back to its defaults.
With the relaxed security, try to run the code again with the correct login credentials, and correct destination email address (you might want to send this email to yourself so you can check that the code actually worked).
I used the code above to send an email to myself and here is what I got in my email inbox.
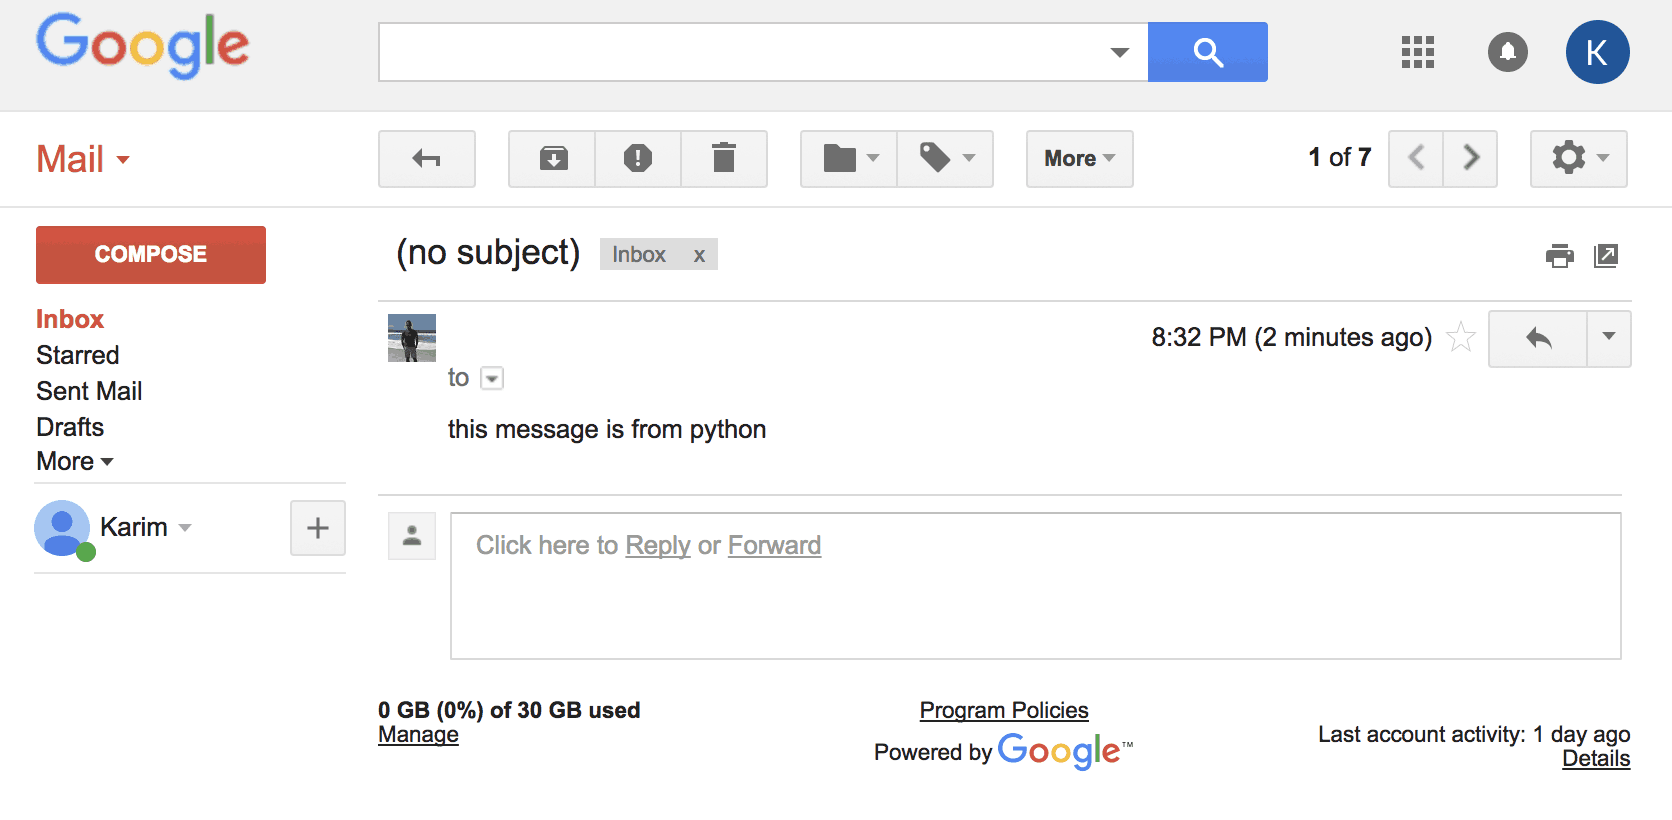
Sweet! We just sent an email from a few lines of python script.
Let’s dig deeper into the code.
Let’s understand the code line-by-line
All the cool things we were able to do was thanks to one python module: smtplib.
Remember that the SMTP protocol is a communication protocol between an SMTP client and an SMTP server.
The smtplib python module defines an SMTP client object that can be used to send email to any machine running an SMTP server.
In our case, the machine running the SMTP server is the smtp.gmail.com and we want our client application (running on our laptop) to be able to communicate with that server.
server = smtplib.SMTP_SSL('smtp.gmail.com', 465)The line above creates an SMTP client object (stored in the server variable).
You can use smtplib.SMTP or smtplib.SMTP_SSL to create the client object. The difference is that smtplib.SMTP_SSL uses a secure encrypted SSL protocol to connect to the SMTP server while smtplib.SMTP doesn’t.
Gmail doesn’t allow communication over a non-SSL or non-TLS channel, so we can’t use smtplib.SMTP to talk to gmail.
If you are curious, here are gmail’s SMTP settings . This is the part we’re interested in:
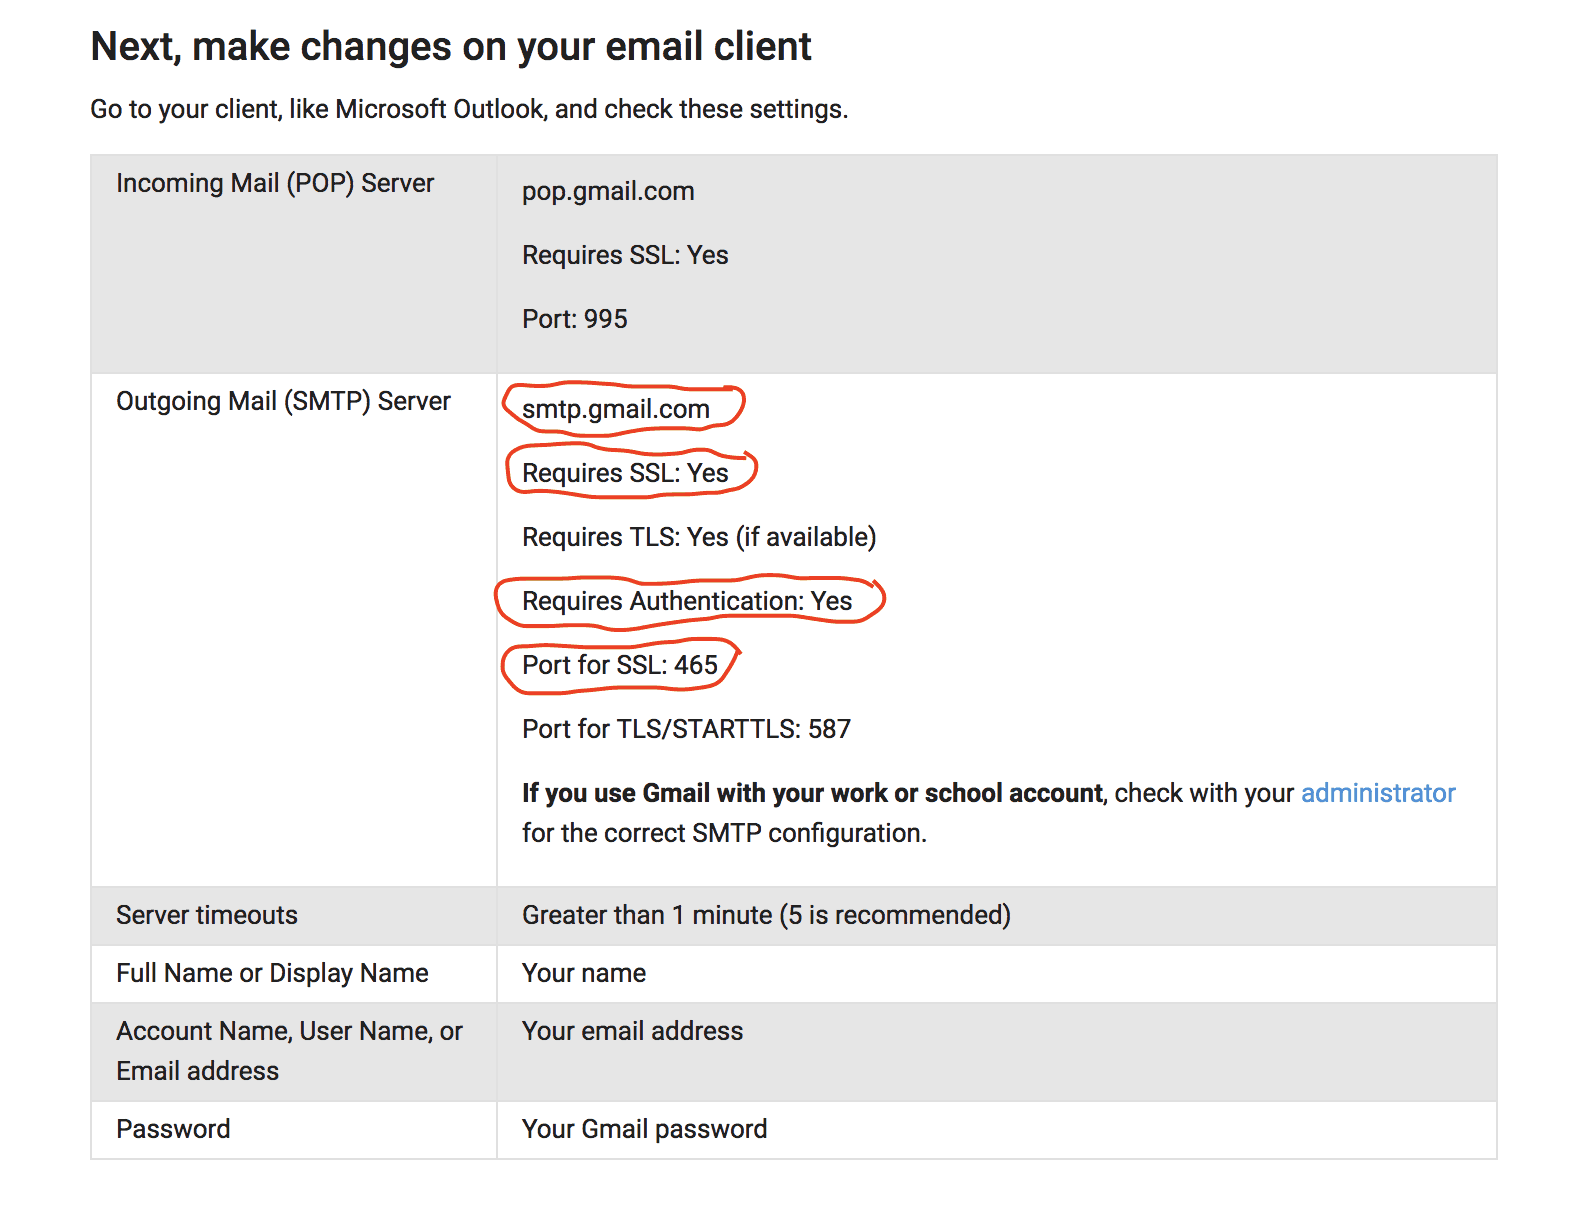
We will need some of these settings to configure our client to properly talk to the SMTP server at gmail.
The important ones are:
SMTP server address: This is the IP address or the domain name of the machine that has the SMTP server running. For gmail, this address is smtp.gmail.com
Requires SSL: This indicates whether the SMTP server requires communication over a secure encrypted SSL channel. For gmail, this is a requirement. This’s the reason why we’re using smtplib.SMTP_SSL instead of smtplib.SMTP
Requires authentication: This indicates whether the SMTP server asks for the client credentials (username and password).
As we all probably know, of course gmail asks for our usernames and passwords so in our case authentication is a requirement.
Port for SSL: This is the port that the SMTP server is listening to. The port number (465) together with the SMTP server address (smtp.gmail.com) uniquely identify the full address of the SMTP server so that our client code can communicate with it.
The difference between the server address and the port number is that the server address will only direct you to the machine that is running the SMTP server.
However this machine is running many applications, but ONLY the SMTP server will be listening to port 465.
If you feel adventurous and you want to learn more, read about TCP/UDP sockets.
And if you want to improve your understanding of networking concepts once and for all, I highly recommend this book by Ross and Kurose. The book is written in an extremely interesting way and is very easy to understand.
Let’s get back to our code.
server = smtplib.SMTP_SSL('smtp.gmail.com', 465)I hope that by now the code makes much more sense to you. The arguments to the function SMTP_SSL() are the SMTP server address and the port number.
This function tries to connect to the SMTP server that lives in smtp.gmail.com and is listening to port 465 over a secure encrypted SSL channel. It returns an smtp object that is referred to by the variable named server.
server.login("your username", "your password")An smtp object has a method login that allows you to authenticate with an email server.
From the previous discussions, we know that gmail requires authentication. If you try to send an email without authenticating first, the gmail server will return an authentication error.
Needless to say, you’ll need to replace the method arguments in the code above with your own credentials.
Now let’s get to the most interesting part, sending the email.
server.sendmail(
  "from@address.com",
  "to@address.com",
  "this message is from python")
smtp objects have another method called sendmail which essentially requests from the SMTP server to send an email. It takes in the source email address, destination email address, and the content of the email message to send.
For instance, in the example above:
from@address.com is the source email address
to@address.com is the destination email address
and “this message is from python” is the content of the email message.
And finally, we use
server.quit()to terminate the connection between our client and the SMTP server.
That’s it folks. It’s that simple! 🙂
Now my question to you
In your gmail inbox after you use the above code to send an email, you will find that the email subject is missing.
How can you add a subject to your email?
Let me know your thoughts.
Hint: check out the email library. It would make your life way easier when you’re dealing with emails. You can still achieve your goals without any extra modules but this would require you to do some more digging into the SMTP protocol.
Learning Python?
Check out the Courses section!
Featured Posts
- The Python Learning Path (From Beginner to Mastery)
- Learn Computer Science (From Zero to Hero)
- Coding Interview Preparation Guide
- The Programmer’s Guide to Stock Market Investing
- How to Start Your Programming Blog?
Are you Beginning your Programming Career?
I provide my best content for beginners in the newsletter.
- Python tips for beginners, intermediate, and advanced levels.
- CS Career tips and advice.
- Special discounts on my premium courses when they launch.
And so much more…
Really thanks for this tutorial.. this really solved my problem.. i as using only smtplib.STMP.. my program was not working.. it gave an error called socket.error: [Errno 111] Connection refused, I have been stuck here for three days.. but after seeing your tutorial i just changed the code to smtplib.STMP_SSL.. and now my code works fine.. thanks a lot..!!
It always makes me happy to know I am helping someone. Thanks Lakshmi!
Hi Karim,
I read your post and the other one about SMTP, both great.
However, I had to problems:
1. “AttributeError: module ‘smtplib’ has no attribute ‘SMTP_SSL'” >> This is because my script was named “email”, so if anyone gets the same error, change that.
2. I keep gettint “Please log in via your web browser and\n5.7.14 then try again.\n5.7.14” error even though I allowed less secure apps. Any idea?
Hey Naiara! I haven’t personally seen this error before when less secure apps were allowed. However, this link might help https://www.digitalocean.com/community/questions/django-gmail-smtpauthenticationerror
Please let me know if you figured out what your issue was 🙂
Hi Karim, thanks for the knowledge. My mail was sent successfully the first time, but all the other times I keep getting this message: TimeoutError: [WinError 10060] A connection attempt failed because the connected party did not properly respond after a period of time, or established connection failed because connected host has failed to respond. I don’t know why this happens.
Hi Brian. I have no idea why this is happening after a successful first time but this error is usually a network connectivity issue.
Hi Karim. Nice post. thanks. Howerver, I am struggling with proxy.The code works in normal pc/browser but I could not find any tip about how to use smtp when my network is protected by a proxy. Any advice? Thanks in advance.
Hi Alireza! Unfortunately smtplib doesn’t support proxies as far as I know but you can do a little hack https://bugs.python.org/issue29687
That said, I highly recommend against this hack. A better solution is to use xsmtplib which extends smtplib and allows for proxy tunneling. https://pypi.org/project/xsmtplib/
You have saved my time. Earlier, I was facing attribute error after checking your code it’s perfectly working fine. Thanks a ton Man!!!.
Glad I helped! Thanks for stopping by.
thanks a lot. i tried many solution but none worked this one is simply amazing.
Awesome. Glad it finally worked out 🙂
Your example works great if I change my Gmail settings to allow less secure connections. what needs to be done to send email with this gmail setting off?
Google states: “If an app or device doesn’t meet our security standards, Google will block anyone who tries to sign in from that app or device. Because these apps and devices are easier to break into, blocking them helps keep your account safe.”
It is not very clear though what exactly these security standards are.
thanks,
after two hours of surfing this tutorial helpe me to send.
Hi Karim. Really nice tutorial!
When I try sending a link nothing is sent… I checked out some videos but I found no answer. How can I do that?
Thanks a lot,
Matteo
Hi Matteo, to send an html email you need to import
You also need to explicitly define an html message like this:
Now when you use the sendmail method, do the following:
Thank you, very useful and simple script
You are welcome!
Hello, Karim!
Nice tutorial, but not work for me. If you could help with my problem. My python keeping teling me AttributeError: module ‘smtplib’ has no attribute ‘SMTP_SSL’… I have renamed script many times. Now it is Alertscript.py.
Any help?
My mistake – I have copied script and tried many different code, but forget to rename the first one, which was email.py…
You are really awesome
Thanks Omkar! I am happy you found the article useful.
Great article. So if I understand correctly, this approach is only good for temporary automatic emailing because it lowers the security of Gmail. Do you have any pointers two things we need to know in order to send emails automatically without lowering the security on Gmail?
Hi Bill. I think this Stackflow page will answer your question https://stackoverflow.com/questions/25944883/how-to-send-an-email-through-gmail-without-enabling-insecure-access
thank you for this tutorial. excellent explanation
Thanks John.