Web severs are everywhere.
Heck you are interacting with one right now!
No matter what type of software engineer you are, at some point in your career you will have to interact with web servers. May be you are building an API server for a backend service. Or may be you are just configuring a web server for your website.
In this article, I will cover how to create the most basic http web server in Python.
But because I want to make sure you understand what we are building, I am going to give an overview first about what web servers are and how they work.
If you already know how web servers work, then you can skip directly to this section.
What is an HTTP Server?
An HTTP web server is nothing but a process that is running on your machine and does exactly two things:
1- Listens for incoming http requests on a specific TCP socket address (IP address and a port number which I will talk about later)
2- Handles this request and sends a response back to the user.
Let me make my point less abstract.
Imagine you pull up your Chrome browser and type www.yahoo.com in the address bar.
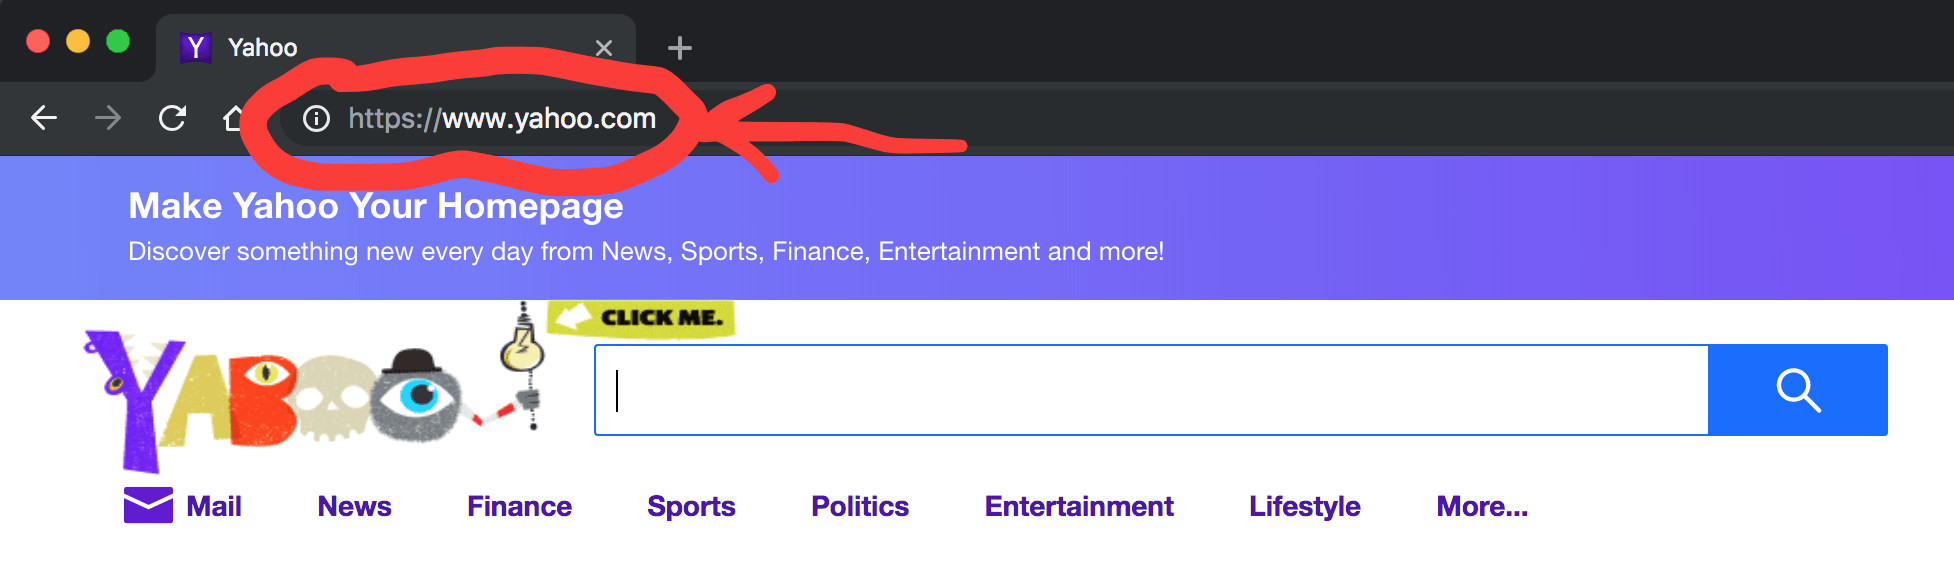
Of course you are going to get the Yahoo home page rendered on your browser window.
But what really just happened under the hood?
Actually a lot of things have happened and I might dedicate a whole article to explain the magic behind how this happened.
But for the sake of simplicity, I will abstract away some of the details and talk about this at a very high level.
At a high level, when you type www.yahoo.com on your browser, your browser will create a network message called an HTTP request.
This Request will travel all the way to a Yahoo computer that has a web server running on it. This web server will intercept your request, and handle it by responding back with the html of the Yahoo home page.
Finally your browser renders this html on the screen and that’s what you see on your screen.
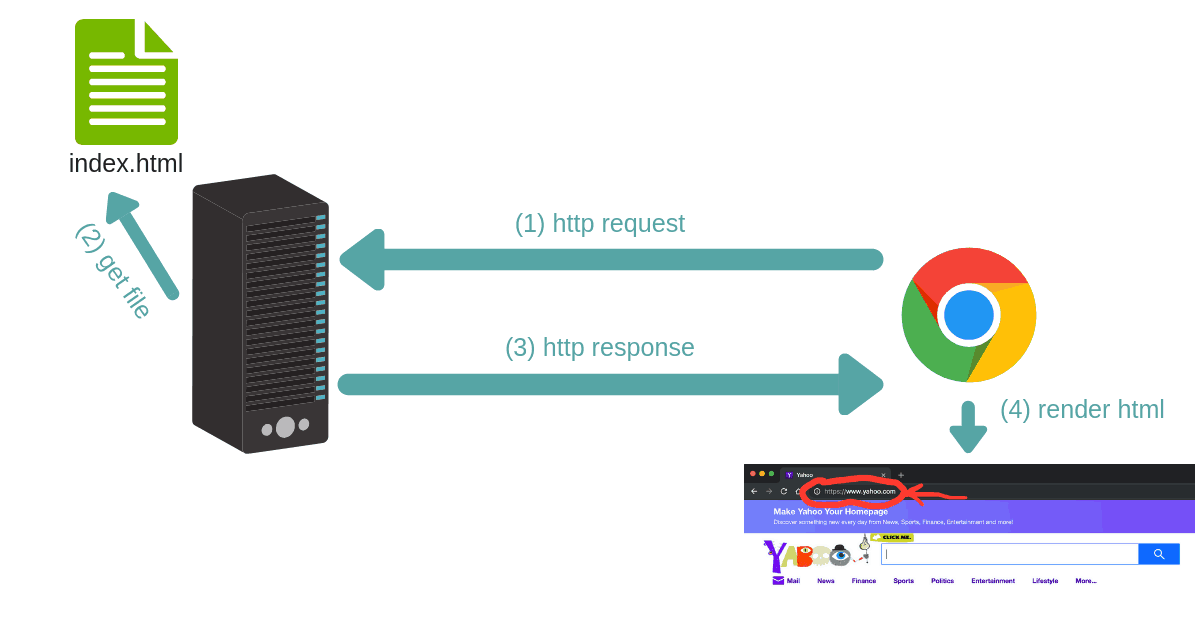
Every interaction with the Yahoo home page after that (for example, when you click on a link) initiates a new request and response exactly like the first one.
To reiterate, the machine that receives the http request has a software process called a web server running on it. This web server is responsible for intercepting these requests and handling them appropriately.
Alright, now that you know what a web server is and what its function is exactly, you might be wondering how does the request reach that yahoo machine in the first place?
Good question!
In fact this is one of my favorite questions that I ask potential candidates in a coding interview.
Let me explain how, but again….at a high level.
The TCP Socket Address
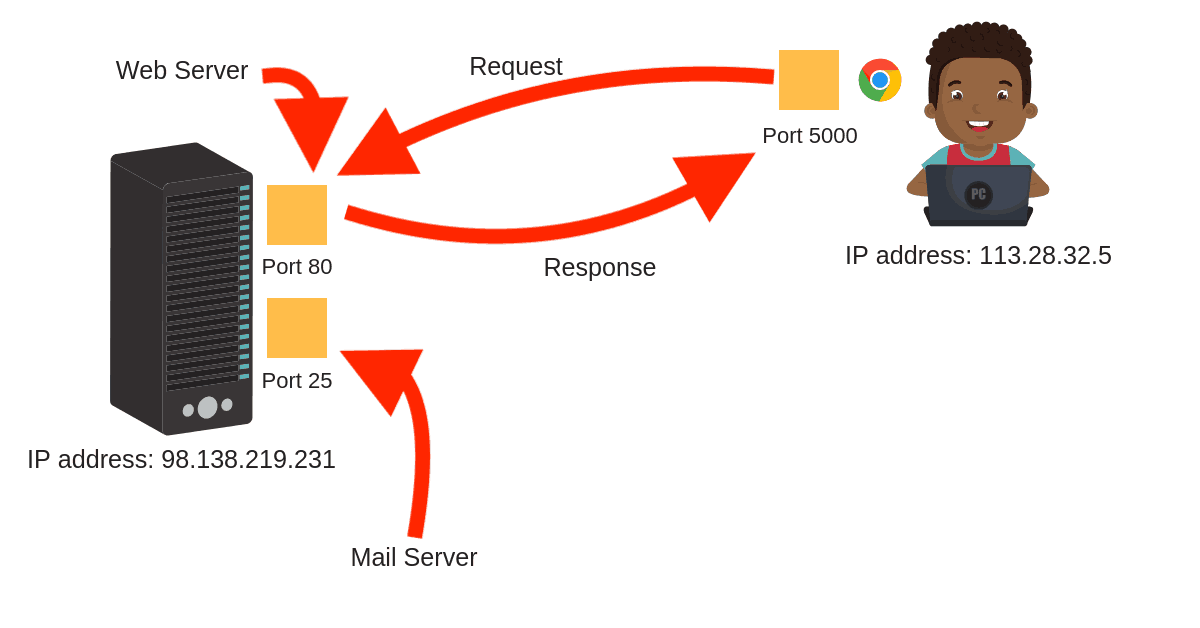
Any http message (whether it is a request or response) needs to know how to reach its destination.
In order to reach its destination, each http message carries an address called the destination TCP address.
And each TCP address is composed of an IP address and a port number.
I know all these acronyms (TCP, IP, etc..) might be overwhelming if your networking concepts are not strong.
I will try to keep it simple but if you are interested in improving your knowledge of networking concepts, I highly recommend this book by Ross and Kurose.
So where is that address when all you did was type www.yahoo.com on your browser?
Well, this domain name is converted into an IP address through a large distributed database called the DNS.
Do you want to check out what this IP address is?
Easy! Head to your terminal and do the following:
$ host yahoo.com
yahoo.com has address 98.138.219.231
yahoo.com has address 98.137.246.8
yahoo.com has address 98.138.219.232
yahoo.com has address 72.30.35.9
yahoo.com has address 98.137.246.7
yahoo.com has address 72.30.35.10
yahoo.com has IPv6 address 2001:4998:44:41d::3
yahoo.com has IPv6 address 2001:4998:c:1023::5
yahoo.com has IPv6 address 2001:4998:c:1023::4
yahoo.com has IPv6 address 2001:4998:58:1836::10
yahoo.com has IPv6 address 2001:4998:58:1836::11
yahoo.com has IPv6 address 2001:4998:44:41d::4
yahoo.com mail is handled by 1 mta5.am0.yahoodns.net.
yahoo.com mail is handled by 1 mta6.am0.yahoodns.net.
yahoo.com mail is handled by 1 mta7.am0.yahoodns.net.
As you can see, the DNS will translate yahoo.com to any of the addresses above.
The IP address alone will allow the HTTP message to arrive at the right machine, but you still need the port number in order for the HTTP request to arrive exactly at the web server.
In other words, the web server is a regular network application that is listening on a specific port.
And the http request MUST be addressed to that port.
So where is the port number when you type www.yahoo.com?
By default, the port number is 80 for http and 443 for https, so even though you haven’t explicitly specified the port number, it is still there.
And if the web server is listening on a non-default port number (neither 80 nor 443), you must explicitly specify the port number like this:

By now you should have all the necessary information to create an http web server in Python.
So without further ado, let’s get started.
Create a simple HTML file
Here is what we want to do.
We want to create a simple http server that serves a static html web page.
Let’s create our html page.
<html>
    <head>
        <title>Python is awesome!</title>
    </head>
    <body>
        <h1>Afternerd</h1>
        <p>Congratulations! The HTTP Server is working!</p>
    </body>
</html>
Now go ahead and save this file as index.html
With the web page that we want to serve out of the way, the next step is to create a web server that will serve this html page.
Create an HTTP web server
In order to create a web server in Python 3, you will need to import two modules: http.server and socketserver
Notice that in Python 2, there was a module named SimpleHTTPServer. This module has been merged into http.server in Python 3
Let’s take a look at the code to create an http server
import http.server
import socketserver

PORT = 8080
Handler = http.server.SimpleHTTPRequestHandler

with socketserver.TCPServer(("", PORT), Handler) as httpd:
    print("serving at port", PORT)
    httpd.serve_forever()
Just like that we have a functional http server.
Now let’s dissect this code line-by-line.
First, as I mentioned earlier, a web server is a process that listens to incoming requests on specific TCP address.
And as you know by now a TCP address is identified by an ip address and a port number.
Second, a web server also needs to be told how to handle incoming requests.
These incoming requests are handled by special handlers. You can think of a web server as a dispatcher, a request comes in, the http server inspects the request and dispatches it to a designated handler.
Of course these handlers can do anything you desire.
But what do you think the most basic handler is?
Well, that would be a handler that just serves a static file.
In other words, when I go to yahoo.com, the web server at the other end sends back a static html file.
This is in fact what we are exactly trying to do.
And that, my friend, is what the http.server.SimpleHTTPRequestHandler is: a simple HTTP request handler that serves files from the current directory and any of its subdirectories.
Now let’s talk about the socketserver.TCPServer class.
An instance of TCPServer describes a server that uses the TCP protocol to send and receive messages (http is an application layer protocol on top of TCP).
To instantiate a TCP Server, we need two things:
1- The TCP address (IP address and a port number)
2- The handler
socketserver.TCPServer(("", PORT), Handler)As you can see, the TCP address is passed as a tuple of (ip address, port number)
Passing an empty string as the ip address means that the server will be listening on any network interface (all available IP addresses).
And since PORT stores the value of 8080, then the server will be listening on incoming requests on that port.
For the handler, we are passing the simple handler that we talked about earlier.
Handler = http.server.SimpleHTTPRequestHandler
Well, how about serve_forever?
serve_forever is a method on the TCPServer instance that starts the server and begins listening and responding to incoming requests.
Cool, let’s save this file as server.py in the same directory as index.html because by default the SimpleHTTPRequestHandler will look for a file named index.html in the current directory.
In that directory, start the web server:
$ python server.py
serving at port 8080
By doing that, you now have an HTTP server that is listening on any interface at port 8080 waiting for incoming http requests.
It’s time now for the fun stuff!
Open your browser and type localhost:8080 in the address bar.
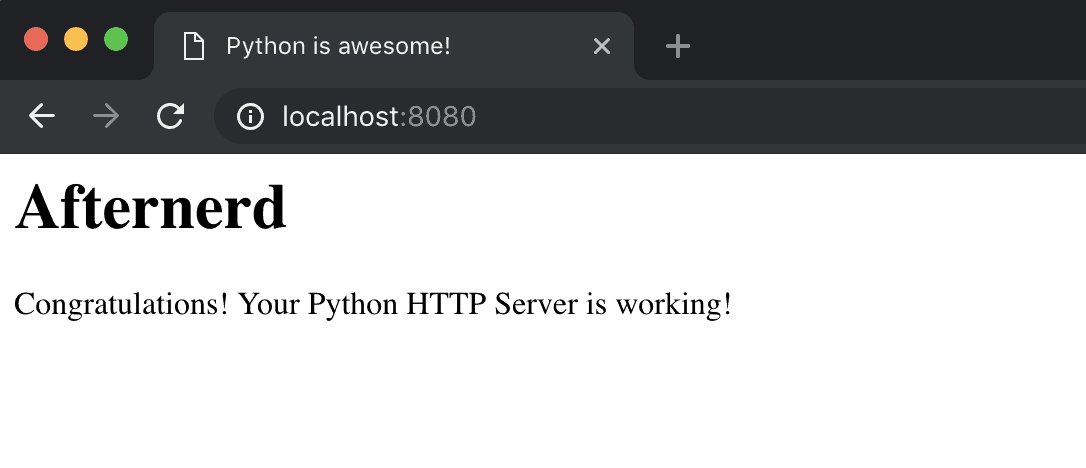
Awesome! Looks like everything is working fine.
But hey what is localhost?
localhost is a host name that means this computer. It is used to access the network services that are running on the host via the loopback network interface.
And since the web server is listening on any interface, it is also listening on the loopback interface.
You want to know what IP address corresponds to localhost?
You got it.
$ host localhost
localhost has address 127.0.0.1
localhost has IPv6 address ::1
Host localhost not found: 3(NXDOMAIN)
In fact you can totally replace localhost with 127.0.0.1 in your browser and you would still get the same result.
Try it out 🙂
One Final Word
You can actually start a web server with python without even having to write any scripts.
Just go to your terminal and do the following (but make sure you are on python 3)
python -m http.server 8080By default, this server will be listening on all interfaces and on port 8080.
If you want to listen to a specific interface, do the following:
python -m http.server 8080 --bind 127.0.0.1Also starting from Python 3.7, you can use the –directory flag to serve files from a directory that is not necessarily the current directory.
So the question now is, why would you ever need to write a script when you can just invoke the server easily from the terminal?
Well, remember that you are using the SimpleHTTPRequestHandler. If you want to create your custom handlers (which you will probably want to do) then you won’t be able to do that from the terminal.
Learning Python?
Check out the Courses section!
Featured Posts
- The Python Learning Path (From Beginner to Mastery)
- Learn Computer Science (From Zero to Hero)
- Coding Interview Preparation Guide
- The Programmer’s Guide to Stock Market Investing
- How to Start Your Programming Blog?
Are you Beginning your Programming Career?
I provide my best content for beginners in the newsletter.
- Python tips for beginners, intermediate, and advanced levels.
- CS Career tips and advice.
- Special discounts on my premium courses when they launch.
And so much more…
Thank you for the detailed post. However, I am getting the following error when executing the python file.
python server.py
Traceback (most recent call last):
File “server.py”, line 7, in
with socketserver.TCPServer((“”, PORT), Handler) as httpd:
AttributeError: __exit__
Found the solution for that issue…
https://stackoverflow.com/questions/7447284/how-to-troubleshoot-an-attributeerror-exit-in-multiproccesing-in-python
There’s a few solutions there but the one that is relevant is to change (see link for explanation)
with socketserver.TCPServer((“”, PORT), Handler) as httpd:
print(“serving at port”, PORT)
httpd.serve_forever()
to
httpd = socketserver.TCPServer((“”, PORT), Handler)
print(“serving at port”, PORT)
httpd.serve_forever()
Great post! Simple but fun! Now onto the more complex stuff..
Thanks for a simple explanation. It is working.
Thank you so much for the post, it helped a lot.
Excellent post, thank you!
Btw, for those of you who get who got this error: “ImportError: No module named http.server”, run `python3 server.py`.
This error occurs because python 2 doesn’t have the `http.server` module.
Thanks Liran!
Great article thank you
It was like a magic thrown just with fingers. Were you a magician before?
I never felt this much happier giving out my email for subscriptions. I would love to read more. Thank you.
Edited: email was spelled wrong previously. i am sorry about another copy of my comments.
Thanks for your nice words, Berka 🙂
Excellent article, thank you for taking the time to share !!
My pleasure! Thanks for taking the time to leave a comment.
Hello. Thank you. Great explanation.
You are welcome Adam!
Well explained! I loved it. Keep doing the good work.
Thank you!
Nice, very detailed and easy to follow post. Keep up the good work!
Thank you!
Hi,
what exactly is the use of such a server which works only for static pages and doesn’t work with PHP and other server side scripts? What is a difference between using Python HTTP server vs just opening the .html page by double clicking?
This doesn’t “only” work for static pages. In this example, I used a SimpleHTTPRequestHandler which serves static pages but you can create any Handlers you want at the server-side that can do pretty much anything you want (talk to a backend database and a bunch of other backend services, populate an html template and return it back to the client).
Thanks for the great post. Now that you have your local web server, how do you allow anyone from the internet to hit the web server with a request and see the HTML page that it responds with?
Great question! For that, you would need a machine with a public IP (e.g. You can rent a machine from AWS, GCP, Azure, or DigitalOcean). In your Python code, you would need the server to listen to this public ip instead of localhost. You might need to setup your firewall to allow inbound traffic and you are done! You can hit this ip address from a browser anywhere in the world and you would be able to see the HTML page. Note that this article is just for educational purposes, so if you “really” want to set up a server… Read more »
Hi Karim,
and is it possible for computers on the same lan to see the local web server ?
Absolutely. But in this case, the server would need to listen to the “private ip address” not the “localhost” of the server machine and then you can open a browser on another machine and type that private ip address.
If your firewall is setup correctly, you will be able to see the html page. If not, it is very simple to set it up (or momentarily turn it off).
I think this deserves a new article 🙂